
WooCommerce is one of the most used WordPress plugins for running an eCommerce store. It is reliable, fast, and provides various features to run your store successfully. Although WooCommerce is quite versatile, it lacks some advanced features. A primary shipping option is included, but what to do if you want more?
What if you want to create shipping costs depending on the number of items in the user’s cart?
Well, you are in luck. Developers from JEM Products have created the plugin WooCommerce Table Rate Shipping that can solve the mentioned problem and do even more. But first, let us explain this fantastic plugin.
WooCommerce Table Rate Shipping – PRO
WooCommerce Table Rate Shipping – PRO provides various benefits for every WooCommerce store. With this plugin, you can adjust and calculate shipping based on different parameters, such as delivery destination, zip code, weight, number of items, etc. Moreover, the plugin’s features don’t end there.
With WooCommerce Table Rate Shipping – PRO, you can also:
- Set up advanced shipping rules established on different variables
- Create custom shipping methods
- Set up a specific shipping method as the only choice for shipping
- Hide particular method for logged in users
However, in this article, we’ll be covering one feature that can be beneficial for your WooCommerce business. That feature is “Shipping by item count.”
What is Shipping by Item Count
“Shipping by item count” refers to shipping charges depending on how many items are in the cart. For instance, if you use this feature on your store, you can give a customer free shipping if he buys more than six items.
Furthermore, if a customer buys more things of the same Shipping Class, you can give them a lower shipping price. Because WooCommerce doesn’t include “Shipping by item count,” Table Rate Shipping – PRO is the best solution for you.
How to Set Up Shipping by Item Count

By now, you have an idea of the benefits of this feature and how it works. But you might ask yourself how to set it up for your store? Setting up doesn’t need to be complex, and with that in mind, we wrote a list of steps to ease your worries. Just follow these five steps and set this feature in your store in no time.
Create Shipping Zones
The first thing you need to do is to define your shipping zone. Shipping zones refer to geographical areas, such as countries and regions. We create custom shipping zones to apply our rules too. You can easily set up a shipping zone by going to the “Shipping” tab. Then click on the “Add shipping zone” button. Here you can give your shipping zone a custom name and specify zone regions.
After selecting your desired shipping area, it is time to add a shipping method. Pick the “Table Rate Pro” method from a drop-down list by clicking the “Add shipping method” button.
Create New Shipping Method With Shipping Rules
After completing the previous step, it is time to set up a new shipping method, and after that, we will also create new shipping rules. To begin with, hover over the “Table Rate Pro” plugin with your mouse. With this, you will uncover two options: “Edit” and “Delete.” Pick the “Edit” option.
Click on the “Add New” button to create new shipping rules. However, keep in mind to enable it by checking “Enable this shipping method.” Otherwise, it won’t be available at your store.
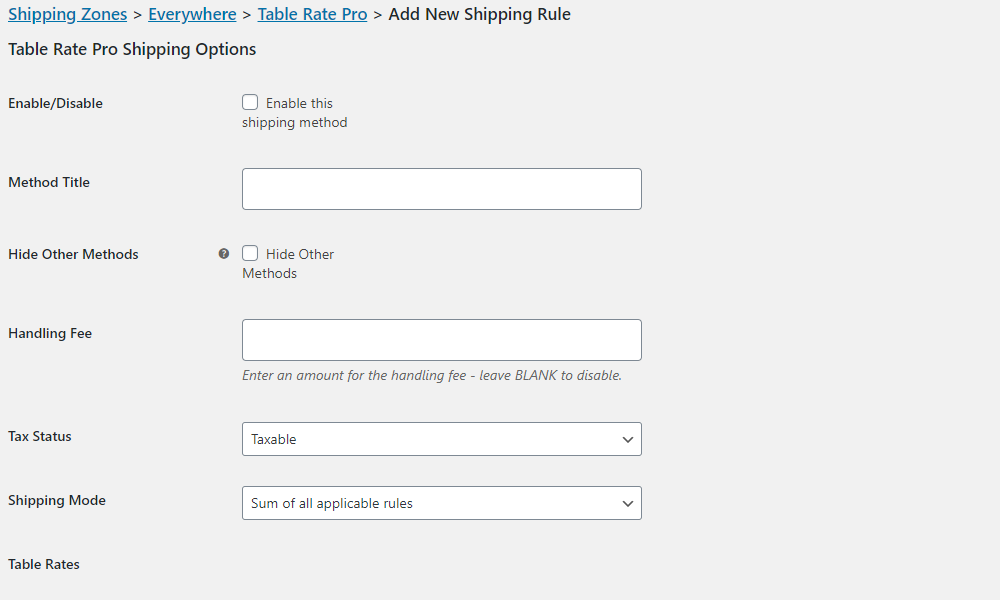
Define the Shipping Rule
The third step is to create a custom name for your method. You can enter whichever word you fancy in the “Method Title.” Keep in mind that this text will be displayed on your checkout page, so you can choose one that resembles your business the best. After that, you can optionally add a handling fee which is added to any order.
To exclude it, leave the text area blank. The “Tax Status” option defines whether our shipping will be taxable or not.
Define Table Rates
In this step, you can define various options included in your shipping rule. The “Class” section describes whether you want this rule to apply only to a specific shipping class. On the other hand, if you wish to use this new shipping rule for all available products, choose the “No Class Set” option from the drop-down list. Next, you have to select a condition of the rule.
Pick “Item Count” under the “Conditions” section. This tells the plugin to set up the shipping based on the number of items in the cart.
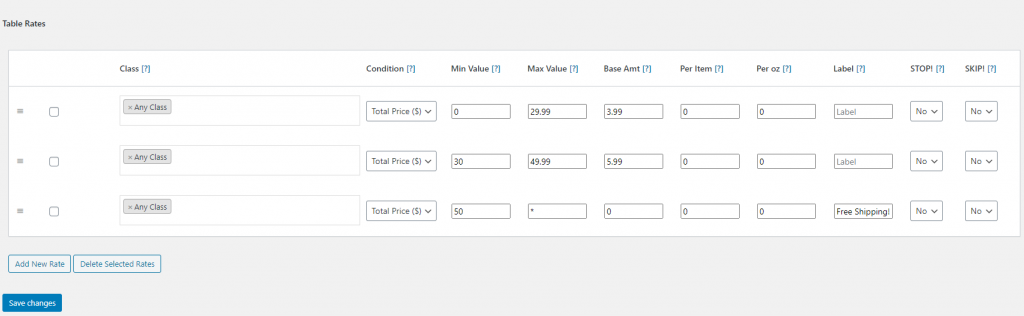
“Min Value” applies this rule to the number of items in the cart. In this case, it applies even to carts without any items. “Max Value” sets the plugin to a maximal number of items. We want all the available items to be affected. In that case, we put an asterisk (*), representing infinity.
The following step will tell the plugin how much you want to charge for shipping. The “Base Amt” represents charges per order, while “Per Item” charges per single item in the cart. Simply put, it doesn’t matter if the cart has one, two, or hundreds of thousands of items; it will still be affected by this rule. Be sure to save your existing changes on the “Save Changes” button.
Inspect the Results
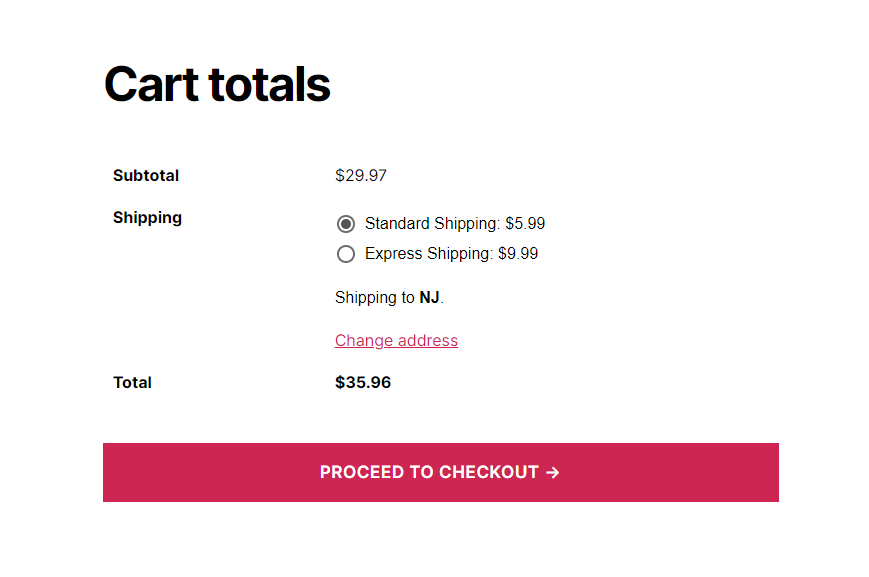
By now, you have created a new rule alongside a new shipping method. But how to check if everything is done correctly? Add a random item to your cart and open your cart section at your store. You can quickly access it by clicking the “Visit Store” button in your WordPress dashboard.
You will see the fixed price of your item alongside the calculated shipping price. You can play around with the item quantity to ensure everything is working correctly.
Conclusion
Managing your WooCommerce store can be an easy task, given the right set of tools. Some tools like WooCommerce Order Export – PRO can help you with all sorts of automated exports. Exports can then be delivered to your inbox for easy item track keeping.
We hope these steps gave you an insight into how easy it is to charge shipping by item with the help of the WooCommerce Table Rate Shipping – PRO plugin.